We make beautiful and stylish dresses for the daughter on any holiday and celebration together. We make a real princess from a girl. Easy instructions and photos
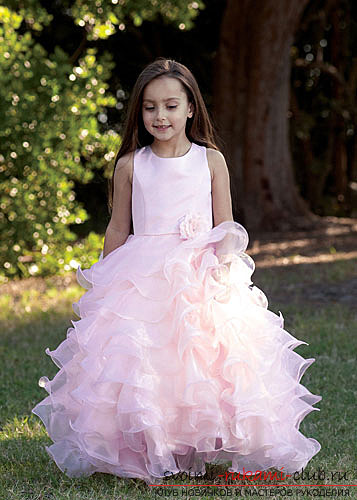
What a little girl does not dream of becoming one daya real magical princess? And every caring mother embodies these cute childhood dreams in beautiful dresses for her daughter. Thanks to simple schemes and techniques for making elegant dresses for a girl, any dream will turn into reality. But when you look at a beautifully dressed girl in a dress that has a lot of different flounces, do you ponder, and how do I also do it? Well, let's find out. First you need to do a tailoring of a skirt with flounces. Let's begin the construction of the pattern of a simple skirt 6-blade. The main thing to do a wedge with a grip, consider a small assembly on the waist line. Also on one of the wedges make a seam in the middle. This will be the designation of the middle of the girl's back. Naturally, before the patterns you need to take measurements from the child. For example, we will choose a girl of 116 centimeters in height. Her parameters: the volume of the chest - 57 centimeters, the waist 55 centimeters. In this case, the size of one wedge will be as follows: the arc from above will be 16 centimeters long, from below the arc will be 68 centimeters, the total length is 70 centimeters. 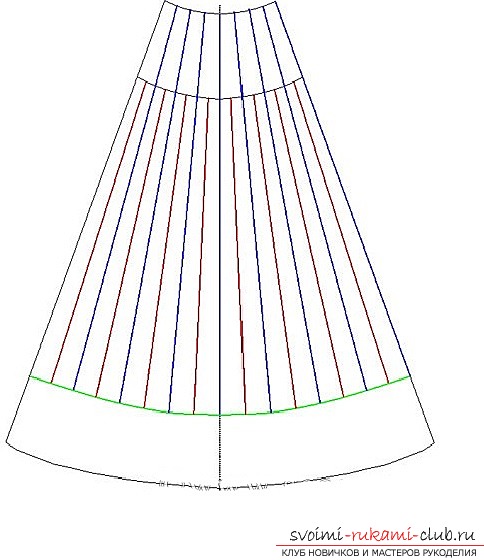 For tailoring you will need these materials:
- Organza. The length is 7 meters and the width is 3 meters;
- A pliable elegant fabric for our skirt. Its number depends solely on the age of the girl, her height and weight. Self-calculate the consumption of fabric for a successful pattern.
Let us proceed to the creation of flounces. For each wedge of the skirt, flounces will be worn. In the drawing, as you can see, the lines and their shuttlecocks are marked with different colors, so that when you tailor you do not mistake anything. The wedge must be drawn according to our drawing. Mark the green line by indenting 9 centimeters from the lower end of the skirt. To the green lines it is necessary to hook down the lower horizontal shuttlecocks. Now gently swipe 15 radial straight lines on our wedge, start from the green line. Eight straight lines make less, having retreated from the upper edge of the wedge of 16 centimeters. These are our straight red colors. All other lines must be marked in blue. To our newly formed direct blue and red color, it is necessary to tuck in vertical flounces. Next we will call them: red and blue shuttlecock. If you do not want to make so many flounces, then divide the wedge into as many segments as you need. Also, you can hold the wedge from below less, thus reducing the number of straight lines to which the flounces are laden.  Shuttlecocks are simple circles that havedifferent internal radii. Nevertheless, the width of each shuttle should be exactly 10 centimeters. We cut the circle in one place exactly by the share thread. Then attach it along the inner circle line. Check the length of the red line on your wedge drawing. It is this length that the inner circle of the shuttle should be. According to the formula, the length should be 2πR, where for the value of π take 3,14. Now count the inner radius of our red shuttle. Its outer radius will be ten centimeters more. Attach one red shuttle to one red line. Also measure the length of the blue line in the presented drawing. Divide the value in half. This will be the length of the inner circumference of our shuttlecock. Count the radius. Flounces of blue color are joined with each other for two. Two connected shuttle must be stitched to one blue line.
  Let's go with the green line. Measure its length according to the drawing, divide the value by two. You will get the length of the circumference of the green shuttlecock. In the same scheme, determine the inner radius. All flounces of green are joined together, however, it is necessary to adhere them to the green line only when our skirt is completely sewn and all vertical flounces have been attached to it. Now you need to do a cut and sew a skirt. Cut all six wedges of our skirt. It is necessary to make the hem a narrow, straight stitch. Open all the necessary shuttlecocks. You should get 96 flounces of blue color, 48 red and 12 green. Attach one to two blue shuttlecocks. All green must be docked to each other. All external sections must be processed with a role weld on the overlock. With a simple sirloin suture, walk along the inner arcs of the flounces. For convenience, arrange the flounces in separate piles, so as not to be confused and know which shuttle should be sewed and where. After that, attach the vertical shuttlecocks to their lines. At the end to the horizontal line, sew the last strip of green flounces. Make the bodice of the dress. It is very important to make a seam from behind, in which the fastener, that is, the lacing and zipper, will be placed. The bodice you can make both on a corset basis, and more simple. To make a bodice you will need:
- Elegant swimming cloth. The length is from 0.3 to 0.8 meters, width is 1.4 meters. The amount of tissue you take in the calculation of the child's parameters. For our girl, the height of 116 centimeters was enough 30 centimeters;
- Cloth for lining. 50 centimeters length, width - 1.4 meters;
- Guipure cloth with clearly legible fragments;
- Spiral bones. Only four pieces. Two to 20 centimeters, the other two to 16.5 centimeters for the side and relief shelves. Also four plastic bones for a rod with eyelets, each 14 centimeters;
- If you do not find the right color for the fabric, take also a paint to tint the parts. Also fastener, lacing, bead, eyelets and, if desired, crystals.
Technique for collecting the bodice. All details of our bodice are duplicated with glue cloth. Connect all the elements of the bodice. Of course, it is worth considering that the dress is made for the child to grow, so do not forget to leave the allowance under the lacing. In our case, it will be 7 centimeters if you count the amount on both halves. From the guipure, cut out the details. You can always buy ready-made fragments that will match the color of the dress. Or paint them with colors, creating the necessary shade. Attach all the details to the bodice. Sew them with beads. Do also straps, for ease of ironing, prikolov two ends to the ironing board. When it is stretched, ironing it is much easier. Pick up the skirt at the waist and stitch it to the bodice. In the seam, sew a zipper, both on the back of the bodice and in the skirt. Attach straps to the bodice of the bodice. And add a lining to the top of the bodice. On the top of the bodice, trim the lining. Manually carefully add the lining of the bodice to the zipper and waist. Now you can decorate the top with beads. Attach the straps to the back of the bodice and attach details from the guipure to them. Also these details you can use to create a girl's hair ornament. For greater effect, decorate the bodice with charming Swarovski crystals. That's all. Our wonderful elegant dress is ready!
Comments
Related posts:
 Various patterns of children's costumes for the holidays. Beautiful and bright models that will help you make an unforgettable image for any holiday. Simple instructions and photos
 A new pattern of Greek dress. We make beautiful dresses together, prepare for a hot summer. Simple instructions and photos
 New and original ideas for the design of children's dresses. Beautiful and unique solutions that will help you make a wonderful gift to your beloved daughter. Easy instructions and photos
 New and original ideas for the design of a fashionable dress with a lush skirt. Beautiful and unique solutions that will help you make a wonderful gift to your beloved. Easy instructions and photos
 Patterns of skirts for girls with their own hands. Quickly and cheaply make a quality outfit for your daughter. Simple instructions and photos