
We make beautiful patterns of an open dress together. A universal outfit for any event in life. Easy instructions and photos
The first model. The presented chic dress is perfect for real ladies! This outfit should be in your wardrobe for a special occasion! Sewing this dress is not very difficult, as it may seem at first sight. Feel free to start creating and soon you will surprise others with your smart attire. We construct a pattern. Since the presented outfit fitting silhouette, allowances for freedom of clinging take a minimum. How to design and sew a dress? 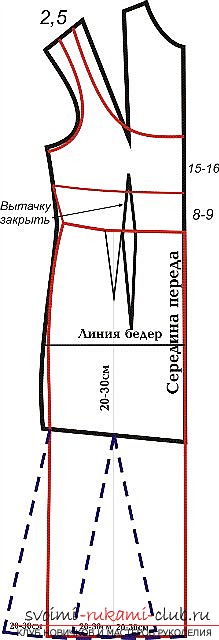 On the front half of the dress, namely, on the skirtit is necessary to make a flare-up, as demonstrated in pattern 1. The more you perform the flare, the finer the skirt will be to the bottom. Draw a pattern of the front detail of the outfit and armhole. Cut off the second element. Cut the top of the front part of the outfit along the applied lines and open it as shown on the pattern. Want more assemblies? Then expand the details by 3 centimeters instead of the proposed 2-x. In a similar way, design the back of the attire.
 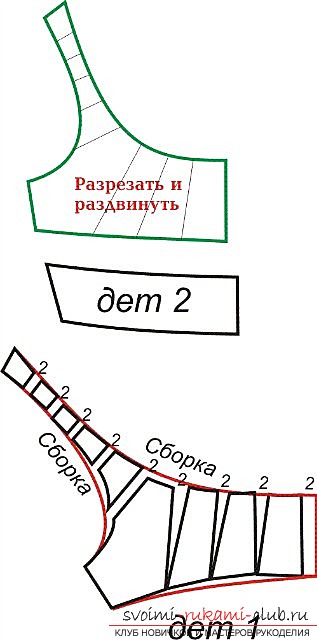 In addition, you need to find an element for draping the dress at the waist: for the second part, cut out the rectangle. Its width should be equal to the width of the detail 2, and the height - 2 times greater.
  A rectangular element must be stitched along2 sides, pull off, fold in pairs on the detail of the outfit 2, tighten, level off at the sides, sweep and stitch. Drape the bottom and top of the second part. Next, sew the element as a single layer.
 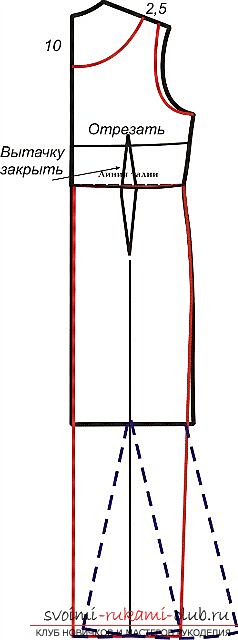 In addition, you need to find 2 rectangles for the bow. Its width is 26 centimeters (ready-made 13 centimeters) and length - 150 centimeters.
 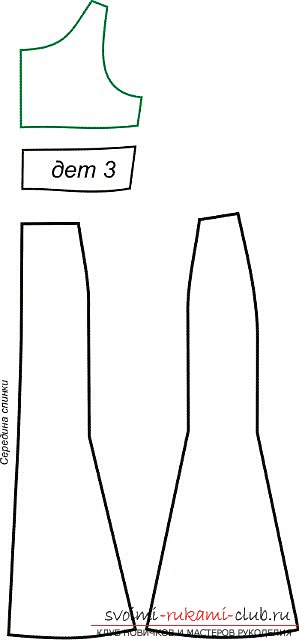 Belt details are sewn on the sides of the dress andtied with a bow on the back. The second model. The presented color dress was created in order to win the hearts of men. Let's start modeling the patterns and sewing the dress. At the front of the dress should be measured from the waist line 24-27 centimeters in the upper area. We draw a horizontal line along the line of the armhole armhole.
 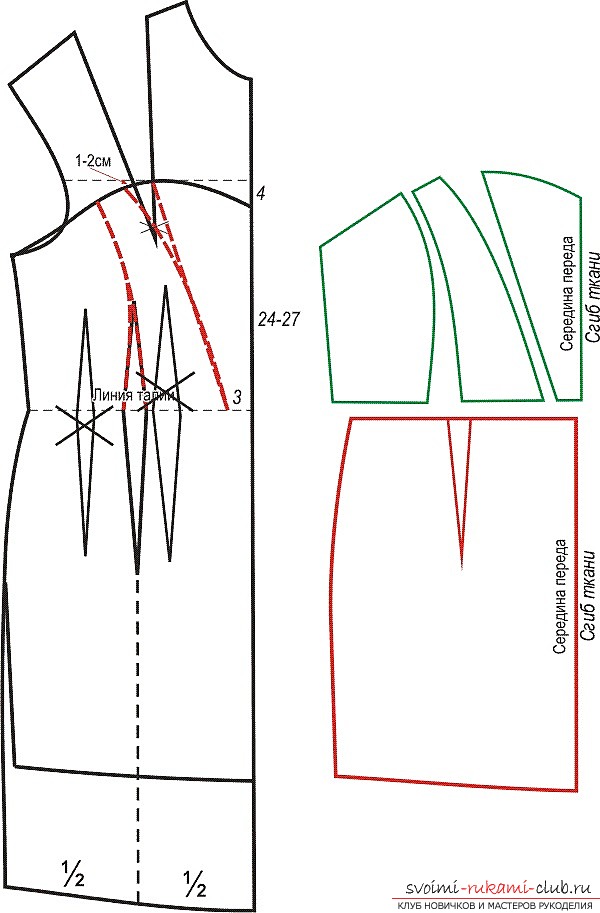 On the front measure in the lower region of 4 centimeters. By drawing, we draw a line of the neckline of the dress. From the middle of the transfer of the product along the waistline, we lay aside 3 centimeters. From the right side of the breast tuck of the outfit we draw a straight line to the point 3. From the left side of the breast tug of the article we draw the relief line along the curve. We move the hitching of the dress in the center of the front part. From the tackle of the outfit of the outfit we draw along the line a line of the second relief.
 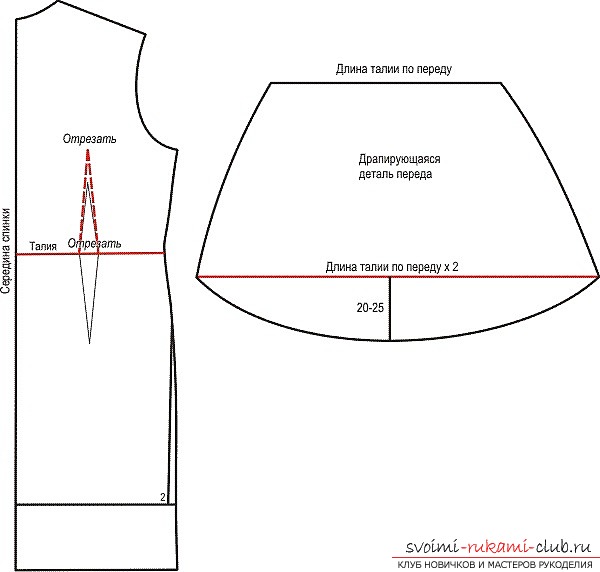 Cut off in front of the outfit strictly along the waist line. We design the product backbone as shown in the figure. It is necessary to build additionally a draping element of the outfit. To do this, you should measure the length along the waist line to transfer the outfit. Set this value aside. The length of the element on the side is equal to the length of the dress on the side from the beginning of the waist to the very bottom. The barrel of the element is reproduced from the side of the product. Extend the detail by 20 centimeters down. We cut out 2 identical parts for drapery, we sew them on the bottom, turn them out and iron them. Now we put the received detail on the front of the skirt of the product and sweep it off the sides. Next, we sew a skirt as a single layer.
  Additionally, reseat the edge of the upper regionproduct, in which the width will be 3 centimeters in finished form. In addition, it should be found: a loafer for a draping element 10 cm wide (5 centimeters ready) and 15 centimeters long. From the lining material we cut all the details of the attire after deduction of the fillets. Emboss reinforced special bones. The third model This small, exquisite black dress, which is neatly embroidered with rhinestones. Such an outfit will make you a real star of any party! You can sew the presented outfit on your own, if you follow all the instructions clearly. First, we pattern the patterns. Because the outfit should be very tight, you can not do the allowances for freedom of fit.
  On the front part of the outfit should be movedvertical breast tuck to the middle. Then we simulate the décolleté zone, the darts at the waist are transferred to the side of the dress. The cut of the front part is cut along the horizontal lines, which are drawn with a dotted line, and also we expand the frill immediately to 2-3 centimeters. Choose the length of the outfit and do it yourself.
 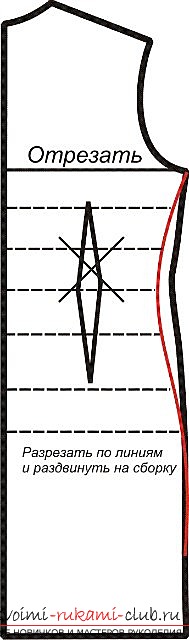 The dress of the dress will be constructed in addition, asdemonstrated on the pattern of attire. The element, embroidered with rhinestones, is modeled, thus, as shown in the pattern. The item is additionally cut in two copies. One element is strengthened by warming, then we extend it with rhinestones or we use ready-made motifs. The collar of the outfit will be constructed separately. This dress is taken at the side seams and strongly fits the silhouette. Therefore, matter is required to be chosen with elastic additives in the composition. In addition we cut out the lining.
 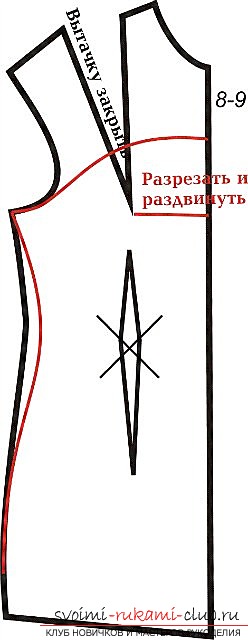 From the main canvas:
- Before the product - 2 elements;
- Backrest - 2 pieces;
- Dressing attire - 2 pieces;
- Collar products - 1 piece with a fold + 2 elements;
- The central element, embroidered with rhinestones - 2 pieces.
From the lining mother to carve:
- Before the product - 1 element with a fold;
- Backrest of the dress - 2 elements.
How to sew a dress? On the sides of the transfer and the back of the product, we make stitches with a stitch length of 4 millimeters. We pull them to the required length in the pattern. On the middle seams, we pass the order and the backs to make the stitches, which have a stitch length of 4 millimeters. We tighten them, we take them. We sweep the side seams of the dress, we spread the product. We sweep the middle seam through the dress, we spread it. 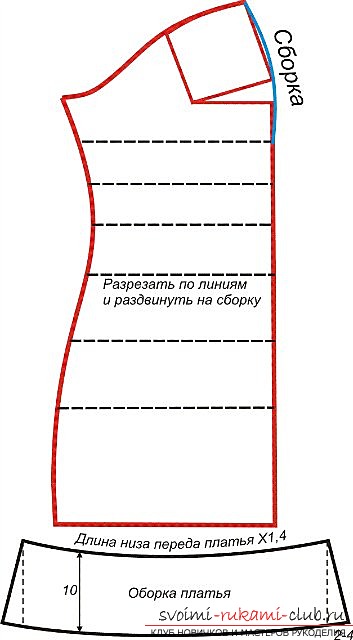 On the back we sew a secret zipper. Sew the lining of the dress along the side seams, as well as on the middle seam of the back to the cut on the fastener. We fold the outfit from the main and lining fabric with faces to each other, sweep and spend on the upper seam. We turn the dress on the front side, we sweep cleanly on the upper area. We strengthen the central pattern with warmth. We turn on the sides. We impose a detail on the outfit, take note, straighten out the assembly of the outfit. On the other element we fold the allowances on the sides. We combine the details among themselves, we put the second element from the wrong side of the dress on the lining, we sweep it. We spend 2 items in one line. On the top element we sew rhinestones and beads by hands. We sew the dresses on the sides of the dress. We pull on the top of the frill. We impose on the bottom of the outfit from the main matter, we take it, we add it. The lining of the outfit is bent along the bottom edge, we take it by hand, we close the allowances. The bottom of the frill is tucked in and out.
 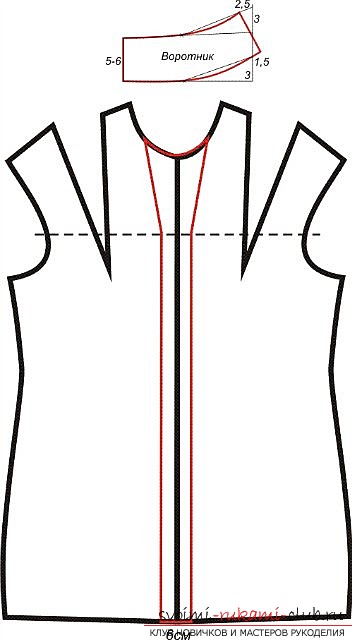 The item of the product gatesuperimpose on the central element and we add it. The second part of the gate we put on top of the first and we spend on the top and sides. We turn it to the front, clean it out. We turn the lower section of the gate, we sweep it, and then we squander it. The collar is embroidered with rhinestones or we are already attaching ready-made motifs. On the middle seam of the back gate we sew hinges and hooks.
Comments
Related posts:
 We make beautiful and stylish dresses for the daughter on any holiday and celebration together. We make a real princess from a girl. Easy instructions and photos
 The original design of the pattern of an air beach dress. A beautiful outfit for a beautiful woman. Photos and instructions
 The original design of the pattern of a stylish dress-transformer. A beautiful outfit for a beautiful woman. Photos and instructions
 The original design of a simple pattern of an airy summer dress. A beautiful outfit for a beautiful woman. Photos and instructions
 A new pattern of Greek dress. We make beautiful dresses together, prepare for a hot summer. Simple instructions and photos