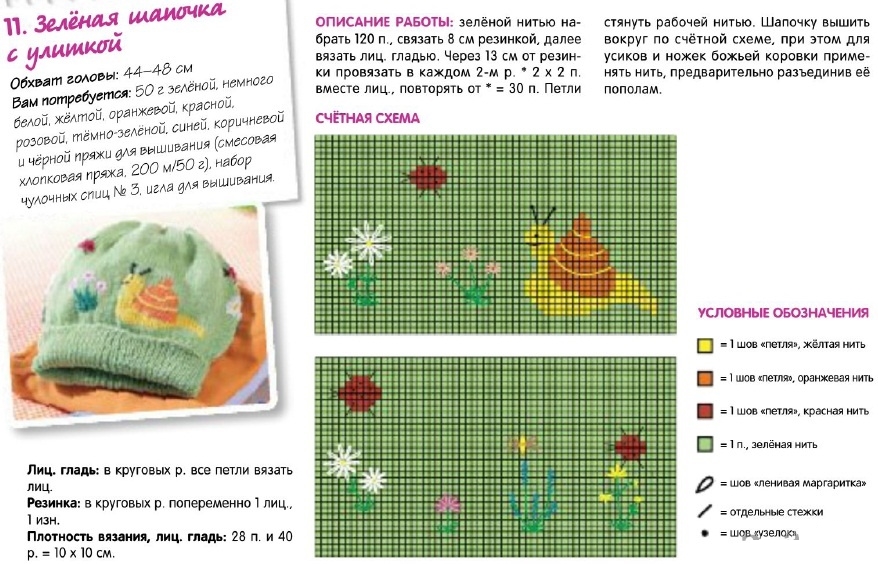
How to make a paper tulip in origami technique
Recalling the super hit of the popular singer “Yellowtulips,” not everyone will agree that spring primroses are harbingers of separation. Let's leave creative invention to the conscience of songwriters, because in fact, graceful buds symbolize the arrival of warmth, the awakening of blooming nature and the thrill of sensual relationships. But you don’t have to wait for spring to enjoy this beauty, because today we will share with you how to make a paper tulip to decorate your home with bright colors at any time of the year. Connoisseurs of the basics of origami paper tulip are notwill be especially difficult with the folding technique, and for beginners in mastering oriental art, below are step-by-step instructions that will help you fold the flower the first time step by step. We will complicate the task a little and invite you to make a tulip from modules - two separately folded parts (bud and stem). In general, any available twig or wire can serve as a flower stem. Thus, apart from colored paper and, possibly, alternative materials for the peduncle, we will not need anything.
Modular origami: Dutch tulip
The Netherlands is rightfully considered the country of tulips.Here they are presented in an unlimited variety of colors and varietal varieties. If you are going to make a tulip out of paper in the image of a classic Dutch flower, make it from colored, or even corrugated, paper of any shade (except green, so that the bud does not merge with the stem). The natural colors of Dutch tulips come in hundreds of variations, so you definitely can’t go wrong with the color. Fold the paper bud according to the diagram
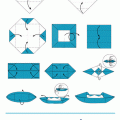
- Square sheet folded in one by one, and then along the second diagonal, adhering to the scheme 1. Then make one more folding line of the sheet - in half. Unfold the workpiece;
- On the planned folds, fold the sheet in the right triangle by tucking it in from two sides (see how to do in Figure 1);
- Open the corners of the workpiece to the top of the triangle (to the right corner) on both sides. The assembly scheme will help to deal with this unerringly;
- Soon the paper flower will open in its splendor, but for now, unfold the workpiece into a second plane, closing the folds on both sides. You will get an even square both from below and from the “face”;
- How to complete an origami tulip?Elementary: fold the diagonally opposite corners of the workpiece towards each other, making the base of the flower an acute angle. It is necessary to overlap one corner over the other, and then tuck one bend into the pocket of the other.
You managed to fold a flower and comprehended the subtletieshow to make a paper tulip with your own hands. But your flower has not yet bloomed. Carefully inflate the bud from the base and bend the petals at random. Now everything is ready, and now you have something to decorate the room, something to give to mothers and grandmothers for the holiday, and something to keep your growing daughter occupied for a long time. By the way, if you liked making paper flowers, then pay attention to the origami rose pattern made from plain or corrugated paper. We promised you that this would be a tulip made from modules - more complex than simple paper crafts. Let's plant the prepared buds on a curly peduncle. We can make it from a green leaf of a suitable size: Carefully make a stem, connect it to the bud and get a paper tulip from modules!
- Squeeze the square sheet diagonally. To one of them, bend the 2 edges, bringing them to the center. One corner of the workpiece turns out to be sharp;
- Now bend the bottom sides of the workpiece to the center (arbitrary, inaccurate - the proportions are not particularly important);
- Reinforce the lower parts of the workpiece inward, invert the bundle and fold it in half across;
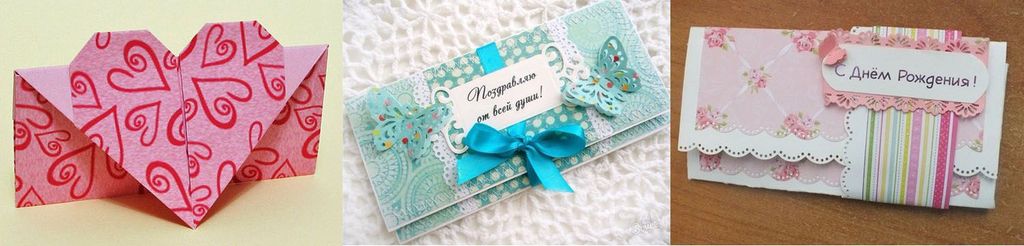
- Now fold the bundle along from yourself. The upper petal of the craft is turned outward and squeezed, then spread the floral pedestal, put the bud on the stem with a spectacular petal. The tulip from the modules is put together - a gift for mom on March 8 is ready. (It remains only to make a postcard and put it in a self-made paper envelope)
 The paper tulip is ready!
Modular origami: the Tien-Shan tulip (Figure 2)
Look at fig.2, if you want to understand how to make a craft in the likeness of real flowers of the foothills of the Tien Shan. These tulips using the origami technique are no more complicated than the previous ones - they differ only in the way they bend the corner into a pocket (see Fig. 2). Having made these paper tulips on your own,don't forget to fold the pedicels for them. They, as you have already learned, can also be made from green paper. The technique is elementary: if you have mastered the “Dutch” pattern, then fold this flower even faster. These DIYs look great. Especially from afar, they can easily be confused with real primroses. But don’t limit yourself to just one bud! Is it better to put together whole bouquets, where each flower will complement the overall composition? After all, a large armful of tulips is much more pleasant to give than one bud. And in the interior the bouquet will look completely different. And don’t forget to show the children how to fold a tulip from a square piece of paper for their grandmother for her anniversary or International Women’s Day on March 8th.Large bouquet of paper tulips