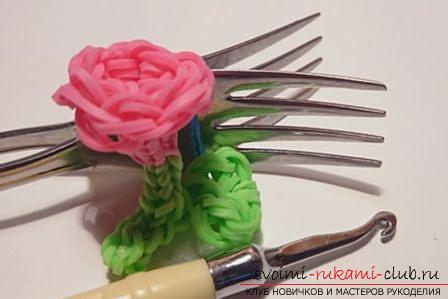
We make roses from the gum with our own hands - a master class with photo and description.
Bright bracelets made of rubberRainbow Loom, now hardly anyone will be surprised. However, this material is an excellent basis for other elegant ornaments. For those who have already mastered the technique of weaving bracelets from rubber bands, we propose to try to make elegant flowers. Such ornaments will serve as a highlight in any image, they will perfectly match up with the outer clothing and other wardrobe items. As the first flower of rubber bands, we chose a rose. 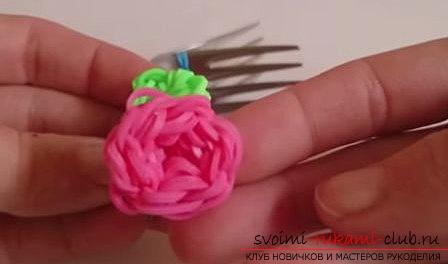 We weave a rosebud with a stem. To make such a nice bud, get 25 elastic bands of red (or another favorite shade) and 18 green for the decoration of foliage and a stem. The work is done on the fork, so that the rose will work without problems and for those who do not have a machine.
  First, a green rubber band is taken and wrapped aroundthree times around the 2 teeth of the fork. Next, take another 3 green gum and pull the remaining 2 prongs of the plug. Using the hook, we throw 3 gum up through the middle. Now we take 2 bands and stretch them horizontally by 4 toothed forks. Further we throw off 3 loops, thrown on 2 prongs. We turn the forks and again we put 2 elastic bands horizontally, having thrown off the 3 lower ones.
 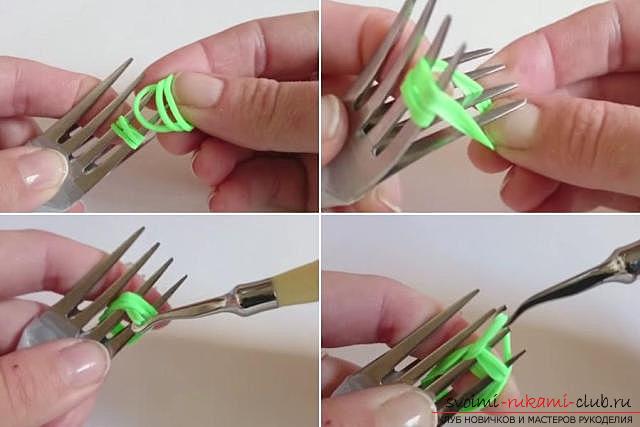 One rubber band is again worn horizontally by 4teeth, and 2 lower rubber bands are discarded from both sides. The fork is turned over, and we repeat the folding in the same way as we did above. All the eyelets from the fork are transferred to the hook.
 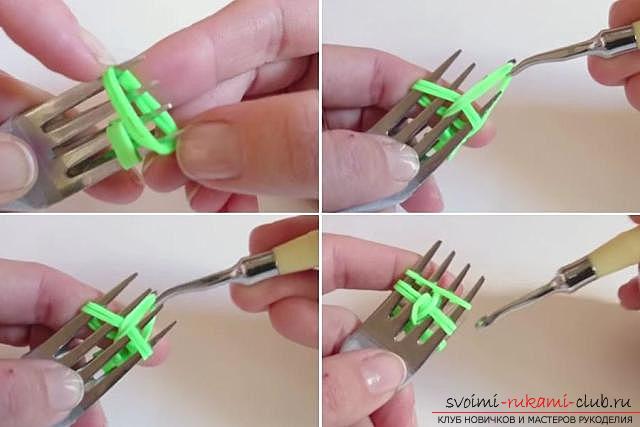 You should get a leaf of a flower. While it can be removed to the side and go to create a rose.
 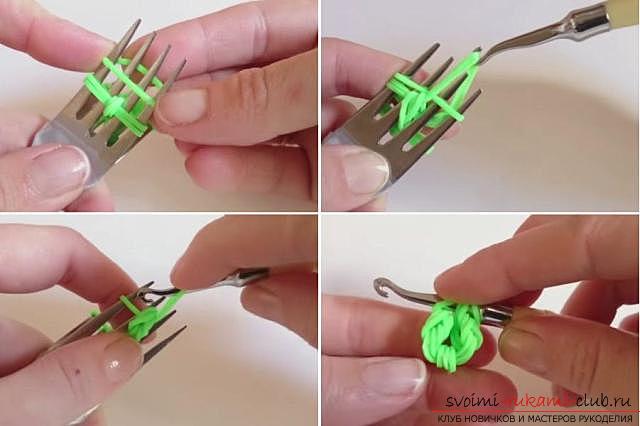 To avoid confusion in the process of weavinga mark is made on the upper fork. We take an elastic band, twist the "eight" and put it on the 1st and 3rd teeth of the upper fork. Next, another "eight" is twisted, which is put on the 2nd and 3rd teeth, and fixed on the 4th. Similar actions are performed on the lower fork. On the tooth from the edge of the dressed rubber "eight", but fixed on the opposite tooth of another fork.
  Similarly to the actions described above, the upperthe fork is again put on the "eight" - on the 1st and 2 middle teeth, and the second on the 2nd and the last tooth. On the other side we repeat and finish the 6th rubber band on the teeth on the opposite side. In total, such actions are carried out three times. The two lower ones are folded with the help of a hook and drop off into the harness. The same actions are taken from the other side. Further one elastic band is dressed horizontally so that it is located on all the teeth of both forks. The fork flips up marked. 2 lower rubber should be thrown off all the teeth. Again, an elastic band is put on both forks and the lower two rubber bands are dropped from all the teeth.
 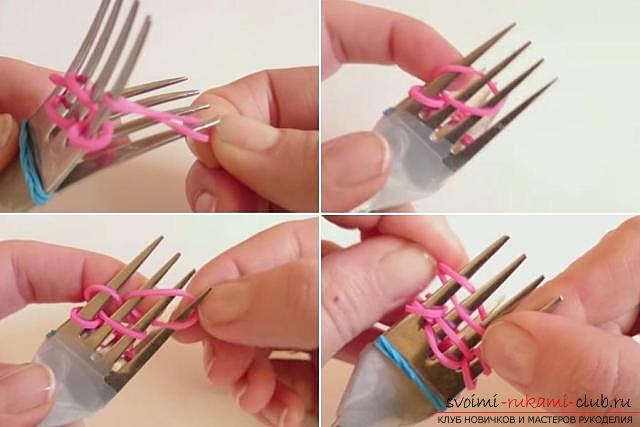 Again put on the rubber on both forks andreset one lower. Such actions are repeated 5 times. Then the loop from the teeth of the middle should be transferred to the tooth from the edge. On the other side, the rubber band is thrown over the center of the teeth. As a result, the rubber should be thrown on 2 teeth of one fork in the socket and 2 teeth from the edge on the upper fork. The eyelets from the outer teeth are transferred to the middle ones.
 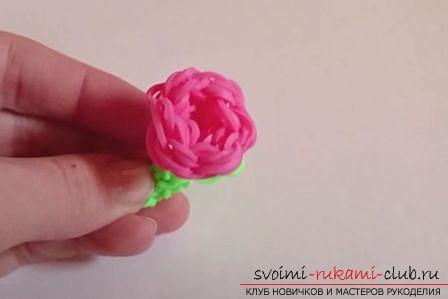 You can begin to weave a stalk of rubberGreen colour. Likewise, only roses are woven, but also other flowers, for example, chamomile, hibiscus and others. Making flowers from rubber bands is not more difficult than creating a bracelet. The main thing here - with great care to dump the rubber, so that the finished product was without holes. The resulting rose is ideal for a bag or as a key fob. From such a gift made by own hands, both children and adults will be delighted.
Comments
Related posts:
 This master class of weaving from gum toys will teach you how to create your own bunny with your own hands
 A detailed master class with a photo of crafts made of rubber bands will teach you how to basketsya basket yourself.
Our detailed master-class with a photo of a toy made of rubber bands will show how the smurfs themselves twine by their own hands.
A master class with a photo is devoted to weaving a toy made of rubber bands, it will be a parrot with our own hands.
A detailed master-class toys made of rubber bands are weaving from the owl's rubber bands with our own hands.
A detailed master class with a photo of crafts made of rubber bands will teach you how to basketsya basket yourself.
Our detailed master-class with a photo of a toy made of rubber bands will show how the smurfs themselves twine by their own hands.
A master class with a photo is devoted to weaving a toy made of rubber bands, it will be a parrot with our own hands.
A detailed master-class toys made of rubber bands are weaving from the owl's rubber bands with our own hands.